Cinema4D: Oil Barrel Tutorial

Welcome to this tutorial for Cinema 4D XL V9. In this tutorial I will teach you how to make a rusted oil barrel.
We will be working with cylinders, torus and tubes.


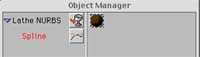
First open your copy of Cinema 4D and you will get in a new project. We will first do a little preparation before we get to work. Please load your materials into your project. The material menu is on the left bottom side of the screen. Please slect the basics.c4d and all the shaders that are in the folder where you installed C4D. On my computer it's : C:\Program Files\MAXON\CINEMA 4D R9\materials


When you succesfully loeaded the materials we can get to work. We are going to creat a cylinder first. In the top menu, select : Object > Primitive > Cylinder. When clicked a cylinder will appear on your screen. This looks nothing like the shape of a oil barrel so we are going to deform it to the correct sizes. When the cylinder is selected please get it up a little bit by using the green arrow, and drag it up till it is above your grid. Now change the values in the object properties as following :

( cylinder must be selected )


We adjusted the rotation and height segments to improve quality of the final render. The more segments, the rounder objects will be. Your object should be looking like the image below now.


To get you a little bit excited we are going to get a material on the object to let it look like a rusted barrel. From your material menu select "metal1" and drag it on the word cylinder shown in your object library. The material icon should appear behind the cylinder. Press the 11th icon on your menu to make a quick render on your screen. It should look like the picture below. The arrow points to the button to get a quick render. It's beautifull isn't it. Remove the material again by selecting it. ( Gets a red border ) and press delete.


Now click the screen and you will get back in the edit screen. Now we are going to use rings to get the barrel more shaped.
Select Object > Primitive > Torus. a big ring will appear. This torus in precisely around the cylinder so no moving has to be done accept for some up and down movement with the green arrow. Get it up to a place that suits you. Divide the barrel in four pieces. Set the rings to the Object properties shown below.


Now select the torus in your objectmenu and press : CTRL + C , the press CTRL + V , two times. you have created Torus 1 and Torus 2 now. when selecting Torus 1 drag it down or up to the right height on the barrel. Do the same with Torus 2. Now press the render button and your image should look something like this :


Starting to look like a barrel now. All we have to do is add a hull on top of the barrel. For this we are going to use a tube. Select Object > Primitive > Tube. A big tube appears. Get the object settings like the following.


Move around the tube using the blue, green and red arrow when the tube is selected. Get it somewhere in the back and the barrel will be done to get the material on. Select all objects in your objectmenu by pressing Shift and clicking all the objects. They should go red.
When done, press the right mouse button and select "Group Objects". All object are now in a kind of map called "Null Object". When rendered your barrel should look like this.


The last 2 steps are putting on the material and saving it to JPEG. To add the material just grab the "metal1" material from your material menu and drop it on the Null Object. When rendered your barrel should look like this :


When you don't like this material you will be able to get another one from the internet somewhere. Or use a texture from www.3d-resources.com and create your own.

Now let's save the barrel as a JPEG and we are all done to show this piece of art to your friends. Zoom in a little bit on the barrel by using your mouse wheel or press the "+" key on your keyboard. Now we must set the render settings, found in the top menu under , Render > Render Settings . You will see a pop-up where you can enter the name of the file. Name it "barrel".

Then do to the second screen by clicking "Output". Select the output size. For example 1024x786.

Now go to the third screen by clicking save on the left side of the pop-up. Browse on your PC to where your picture must be saved and enter a file name. Set Format to JPEG. Set DPI to 200 and your done. Press the closing cross on the right top of the pop-up to close.
Press Render > Render to Picture Viewer and your JPG will be in the map you selected.


Final Image

Cinema4d: Create A Car Tyre Tutorial

You will need the MAKETHICKER plugin, download and drop it into program files/maxon/cinema 4d/plugins, you can find the plugin at the following page...

GET THE "MAKETHICKER" PLUGIN FROM HERE


1. Create a cylinder and rotate it 90 degrees as shown and scale it to look roughly like a tyre, 2. Set the caps to 1 and the HEIGHT SEGMENTS to 4...


MAKE EDITABLE and select both sides as shown, using EXTRUDE, SCALE, EXTRUDE INNER and BEVEL make something resembling the shape of the sides of the tyre as above!


In the top view and in POINT MODE select the middle points and SCALE em out a bit just to give the tyre a little more rounding.


Now we are going to create a tread object to be repeated 1. Make a new POLYGON OBJECT and 2. Here it is, empty ready to build some points/face in it.


1. Make sure your on the MOVE TOOL and 2. In POINT MODE, 3. HOLD "CTRL" and add in some points to make half of the tread pattern as shown (study a few using google images) BRIDGE the points (see my C4D basics tutorial for bridging) to create several "seperate" faces as shown...


To mirror this half 1. Drop a SYMMETRY OBJECT into the scene 2. Drop the tread object into the SYMMETRY and 3. Set MIRROR PLANE to "XY" 4. to get it to mirror onto the other side as shown.


Make the SYMMETRY object EDITABLE and you end up with a symmetry and a POLYGON, drag the POLYGON out as shown and delete the symmetry as its no longer of use to us, we have a POLYGON OBJECT made from both sides....Cool eh? ;-)


1. From the front view and in POINT MODE edit the points to follow the tyre more closely, 2. Heres where we use the MAKETHICKER PLUGIN, in FACE MODE select all the faces in the POLYGON tread object and choose MAKETHICKER from the PLUGIN MENU up top, set it to "2" and APPLY and as you can see instant thickness...very quick, very cool!!


1. Add a bit more detail to the treads using EXTRUDE/INNER/BEVEL etc and 2. Choose FUNCTIONS and 3. DUPLICATE, 4. Input a number here something between 40-60...I used 50 in the end and 5. Set the MOVE to "0" as Y is set to 500 by default.


1. DUPLICATE gives us a NULL OBJECT filled with 50 copies of the tread object, now we need a SPLINE to arrange these around, 2. Drop a CIRCLE SPLINE into the scene and 3. SCALE it to fit the tyre roughly


At this point when I ARRANGED the tread around the spline they faced outwards, so I ROTATED the SPLINE by 180 so it was facing the opposite way and for some reason this worked ;-))


Anyway heres the ARRANGE part 1. SELECT the NULL OBJECT containing all the copies, 2. Choose FUNCTIONS>ARRANGE and 3. Type in "Circle" so it knows which SPLINE to ARRANGE around...


BANG!! there you go a nice car tyre with chunky tread, different patterns can be found online and by scaling the NULL OBJECT you can make the tread stick out more or less etc...Also the amount of duplicates must be experimented with to get the kind of tread spacing you want ;-))


Throw a Black texture onto em and there you go, maybe make a decal for the writing on the sides or use a BUMP MAP to raise the lettering....Have Fun!!

Cinema4D: Create Shape Transitions in 5 Minutes Using PBlurp Tutorial

This tutorial requires you have the Thinking Particles plug-in for Cinema 4D and you are past beginner stage with the software. Start a new scene and bring in a primatives cube. Move the cube along the Z-Axis, with the Model tool selected choose the move tool and drag the blue arrow. Move it to around position 300M on the Z axis. Bring into the scene a sphere. Move this along the Z-axis also but in the negative direction to around -300M. In the properties for the cube set the number of segments for X,Y and Z to 10. Make the cube and the sphere editable (C on the keyboard).


On the menu at the top choose Plugins -> Thinking Particles -> Particle Geometry. Move the sphere and the cube inside this object in the objects palette. Using the toggle buttons make the sphere and the cube invisible. Bring a null into the scene (Objects -> Null object). We are going to apply and Xpresso setup to this null. Select the Null in the object palette then, within the object palette, goto File - > Cinema 4D tags -> Xpresso. In the window that pops up right click in the grid space and choose New Node -> Thinking Particles -> TP Generator -> PBlurp. Click on the newly create node to display its properties in the bottom right. Drag the sphere then the cube into the Objects parameter.


Now, make sure the animation header is on 0 F and right click on the Animation Phase parameter of the PBlurp node. Choose Animation -> Add Keyframe. Move the animation header along to the end (usually 90 F by default), and change Animation Phase to 100% then add another keyframe. Rewind the animation header. We are almost finished now, just tweaking of the Blurp to do. Firstly in the Object parameter of the Blurp (where you dropper the sphere and the cube), hold shift and click on both the sphere and the cube to highlight them both. This ensures the changes you make are identical to both objects. Now, if you followed my instructions, you will have to change the From To parameter to +Y to -Y, I also increased the IN and OUT Tangents to 400 each to get a better arch. Make the count parameter 1000 and change both Thickness parameters to 5%. Press play and enjoy. It also helps if you apply two different colour materials to each object. This method can make a whole bunch of different effects using different parameters and input objects, so EXPERIMENT.


Bellow is a PBlurp animation I made. I sphere explodes and the particles emmited for 'OPIFEX'. This is a really neat and fast effect to do. Due to bandwidth restrictions I cannot offer the animation to download. I can, however, offer an example scene for your pleasure.

Cinema 4d Tutorials: Making an hourglass

This tutorial will teach you to make a great sandglass, which you can use for plenty of purposes. You can find the finished model and other stuff here Glass.zip


Start a new scene. Go to back view. Go to Configuration\background image. Choose your blueprint. I used this one:

Image

Now to begin! Go to Objects\spline object. Choose vertex selection and add points like on the image shown (you add the points by holding 'ctrl' and clicking your mouse button).

(If you image seems deformed, type these values for your background image:size x=900;y=100).

Image

Draw out the edges of the glass part. It MUST be two-sided (it must have an inner and outer edge) . Start from the bottom following the outer edge, and when you reach the middle of glass part, start doing the same for the inner edge until you get to the beggining . Type must be linear Linear.

Here you can see how the edge should look:

Image


Create a Lathe object. Put your line in it (just drag it onto it).

You will get the glass body. Now we must make the rest of it.

Upper and lower holder:

For the holders, we need to insert two sircles into our scene and position them according to the image.

Image

Make two extrude objects, and place the circles into them. Type these values in: Movement: x:0; y:90; z:0

Start Cap: Cap and rounding; end cap: cap and rounding;

Rounding type: 2 steps. (in version 9 the radius should be 19).

Image

Now for the two sticks on the sides. These are the two you saw in the previous two images. I won't explain how to make them, because the process is identical as with the glass body. Because they are not hollow, you don't need to draw the inner edge, only trace the outer. Mine came out like this:

Image

The model is nearly over. All you have to do is to insert everything into a hypernurbs object (except the two extruded circles, they need to be sharp).

Image

The model is now over. Now for the materials.

GLASS

Make a new material. Double click it and name it 'glass'.

Color.

The color should be pure white. The brightness to 100%

Diffusion.

Diffusion should be around 19, because it still keeps some light on it. Uncheck all checkboxes.

Transparency.

The color should be pure white with brightness of 100%. Refraction must be Fresnel, and give it a value of 1.52. Pick Frasnel for texture And click a little preview image to edit it . Mix mode must be Multiply. Make it white with a LITTLE very light gray at the ends.


Reflection.

Seti it up as on the image below.

Image

Specular.

Set it up as on the image. (If you have older versions, where you don't have fallof and innerwidth, make height 700%, and width 0).

Image

Drag the material onto the glass body and render it. If you did everything right, you got something like this:

Image


Although the glass doesn't seem very realistic, it is. To see the material like it really is, insert a floor object and an Omni light. Now the material shows it's real qualities.

THE COPPER MATERIAL


Since this is and old thing, we need an old material. The most popular for sandglasses (and the prettiest) is copper.

Make a new material and double click it.

Color.

Image

Reflection.


Image


Environment.

The scene's reflection is not enough. To add a little more realism, we should put an Environment. That image will be reflected on the copper.

Image

This is the environment you need:

Image


Specular.

Copper is kind of a dull metal, and that is why we need width:


Image


Drag it to the rest of our objects and render it. You should get something like this:

Image

Hmmm, it doesn't seem real enough. Select the omni you made earlier . Give it these parameters:

Type: Omni

Shadow: Soft

Go to Render Settings and under Antialiazing choose Best. Render the scene.

Image

Source

Cinema4D tutorials: A Simple Bowl

A Simple Bowl

Getting started with C4D XL, splines and NURBS.

This example introduces a few basic concepts in C4D:

  1. setting up the windows to work in the "front" (XY) view
  2. making a bowl cross section using splines and the points tool
  3. lathing the cross section into a 3D bowl using NURBS
  4. adding a wood shader to make it look like wood
  5. changing the spline to modify the shape of the bowl
  6. fiddling with the wood shader for different effects

Making a bowl: Step 1 - Set up your windows

When you first start C4D, several windows and palettes will be opened for you. Start by arranging these in the most useful layout for your monitor.

The main project window (which starts out as "Untitled") is where most of the action will take place, so make it large enough.

You will also need the Object Manager and the Material Manager, and the default palettes. Leave these around for now. The other stuff can be put away if you need the space on your monitor.

We'll start making the bowl by drawing its cross section. To do this, we want to be looking "flat" at it, so set the main window to the "XY" view by clicking on this palette button:


Making a bowl: Step 2 - Make the cross section

The cross section is made using a spline. Start with an empty spline by making one from the Objects menu:

Not just any spline will do for such a fine bowl. Let's make it a Hermite spline (don't ask). Also, don't close it right now, since this will only confuse the drawing. Save the closing for later. Set up the spline using a dialog like this one:

Now we have an empty spline. Notice that it appears in the Object Manager, but since it doesn't have any points, there's not much to see yet in the main window. Now it needs a few points, so select the Points tool by clicking on this palette button:

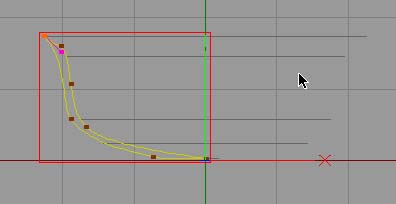
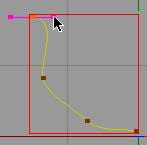
Once the point tool is selected, you will be able to add points to the spline by clicking with the CTRL key down. Each point has a center and two tangents.

Don't worry about the tangents for the moment. Just add the points roughly in the shape of a cross section. If you mess up, you can delete a point by selecting it and clicking the delete key. If you wind up deselecting the spline, you can select it again by clicking on its name in the object manager. A yellow spline will curve around your points.

When you are done, you should have something like this:

Now close the spline by double clicking on the spline icon in the Object Manager to open up the Spline dialog. Click the "close spline" box:

Drag the spline's points and tangents as you like to make the right shape for the cross section of the bowl. It will be rotated about the Y (green) axis next, so you can keep a mental image of what it's going to look like. To make corners or to adjust the tangents independently of one another, hold down the Shift key as you drag the tangent. You can always change the spline later.


Making a bowl: Step 3 - Make the NURBS

Once the cross section is done, it can be made 3 dimensional by using a NURBS object, that will rotate it around the Y axis to trace out a surface. (NURBS = Non Uniform Rational B-Spline. Don't worry about it. It's really just a way of making a spline into a 3D object, while retaining the ability to change the 3D object by modifying the spline.)

To make a lathe NURBS, select the Lathe NURBS menu item from the NURBS submenu of the Object Menu:

This will create an "empty" lathe NURBS object. (Just say OK to the dialog). To apply our spline to it, drag the spline (in the Object Manager) on top of the NURBS object until the cusor changes to a "drop" cursor and let go. The Spline will then become a child of the NURBS, and will appear indented in the Object Manager. The NURBS will get a triangular knob that you can click to reveal the Spline child:

Notice also that the main window has updated to show the action of the NURBS on the spline:

Cool.

Now we have a bowl, believe it or not. To see it, click on the "render in editor window" palette button:

You should then see something that looks very much like a bowl, made of a nondescript white plastic material:

If you're happy with white plastic, you're done. Otherwise, we can now add a material to the bowl to turn it into wood.

Making a bowl: Step 4 - Make it Wood

The first step to making the bowl turn to wood is to define a Wood material. This is done in the Material Manager. Select the Material Manager window, then from the File menu, choose "Open 3D Shader." The 3D shaders are in the "tex" folder that installs with Cinema 4D. Select the 3D shader called "wood.shv." For now, we'll just take the default wood. A wooden ball appears in the Material Manager. That's your wood.

Drag the wood material from the Material Manager and drop it on the Lathe NURBS. Just accept the defaults in the dialog that opens up. The Object Manager now shows that the material has been applied to the bowl:

Now render again to see the wooden bowl. It should look like the picture at the top of the page.


Making a bowl: Step 5 - Reshape it

Because the bowl is a NURBS, we can now change its shape by editing the spline. Select the spline in the Object Manager, and use the Points tool to move a few of the points around and reshape the spline. Maybe a wider bowl with less of a lip :

Now render again, and you will have a new bowl:

Now you're ready to make the bowl from a different kind of wood

Making a bowl: Step 6 - Use different wood

Maybe Walnut isn't the best, or we might want finer or swirlier grain. Whatever. If you double click on the Wood in the Material Manager, you will open up the settings dialog. Fiddle around with the settings to see what effects you can get. Perhaps you'd like something in Pine ?

Rendering with this material gives a new bowl:

You can get rid of some of the jagged edges by opening the Render Preferences dialog (from the File menu) and turning on Anti-Aliasing (Edge Color).