A Simple Bowl
 |
Getting started with C4D XL, splines and NURBS.
This example introduces a few basic concepts in C4D:
- setting up the windows to work in the "front" (XY) view
- making a bowl cross section using splines and the points tool
- lathing the cross section into a 3D bowl using NURBS
- adding a wood shader to make it look like wood
- changing the spline to modify the shape of the bowl
- fiddling with the wood shader for different effects
Making a bowl: Step 1 - Set up your windows
When you first start C4D, several windows and palettes will be opened for you. Start by arranging these in the most useful layout for your monitor.

The main project window (which starts out as "Untitled") is where most of the action will take place, so make it large enough.
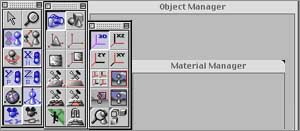
You will also need the Object Manager and the Material Manager, and the default palettes. Leave these around for now. The other stuff can be put away if you need the space on your monitor.
We'll start making the bowl by drawing its cross section. To do this, we want to be looking "flat" at it, so set the main window to the "XY" view by clicking on this palette button:

Making a bowl: Step 2 - Make the cross section
The cross section is made using a spline. Start with an empty spline by making one from the Objects menu:

Not just any spline will do for such a fine bowl. Let's make it a Hermite spline (don't ask). Also, don't close it right now, since this will only confuse the drawing. Save the closing for later. Set up the spline using a dialog like this one:

Now we have an empty spline. Notice that it appears in the Object Manager, but since it doesn't have any points, there's not much to see yet in the main window. Now it needs a few points, so select the Points tool by clicking on this palette button:
 Once the point tool is selected, you will be able to add points to the spline by clicking with the CTRL key down. Each point has a center and two tangents.

Don't worry about the tangents for the moment. Just add the points roughly in the shape of a cross section. If you mess up, you can delete a point by selecting it and clicking the delete key. If you wind up deselecting the spline, you can select it again by clicking on its name in the object manager. A yellow spline will curve around your points.
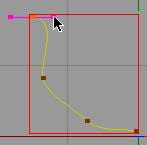
When you are done, you should have something like this:

Now close the spline by double clicking on the spline icon ![]() in the Object Manager to open up the Spline dialog. Click the "close spline" box:
in the Object Manager to open up the Spline dialog. Click the "close spline" box:

Drag the spline's points and tangents as you like to make the right shape for the cross section of the bowl. It will be rotated about the Y (green) axis next, so you can keep a mental image of what it's going to look like. To make corners or to adjust the tangents independently of one another, hold down the Shift key as you drag the tangent. You can always change the spline later.

Making a bowl: Step 3 - Make the NURBS
Once the cross section is done, it can be made 3 dimensional by using a NURBS object, that will rotate it around the Y axis to trace out a surface. (NURBS = Non Uniform Rational B-Spline. Don't worry about it. It's really just a way of making a spline into a 3D object, while retaining the ability to change the 3D object by modifying the spline.)
To make a lathe NURBS, select the Lathe NURBS menu item from the NURBS submenu of the Object Menu:

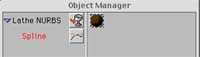
This will create an "empty" lathe NURBS object. (Just say OK to the dialog). To apply our spline to it, drag the spline (in the Object Manager) on top of the NURBS object until the cusor changes to a "drop" cursor and let go. The Spline will then become a child of the NURBS, and will appear indented in the Object Manager. The NURBS will get a triangular knob that you can click to reveal the Spline child:

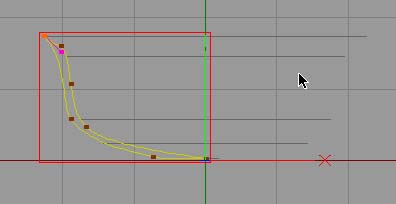
Notice also that the main window has updated to show the action of the NURBS on the spline:

Cool.
Now we have a bowl, believe it or not. To see it, click on the "render in editor window" palette button:
 You should then see something that looks very much like a bowl, made of a nondescript white plastic material:

Making a bowl: Step 4 - Make it Wood
The first step to making the bowl turn to wood is to define a Wood material. This is done in the Material Manager. Select the Material Manager window, then from the File menu, choose "Open 3D Shader." The 3D shaders are in the "tex" folder that installs with Cinema 4D. Select the 3D shader called "wood.shv." For now, we'll just take the default wood. A wooden ball appears in the Material Manager. That's your wood.
Drag the wood material from the Material Manager and drop it on the Lathe NURBS. Just accept the defaults in the dialog that opens up. The Object Manager now shows that the material has been applied to the bowl:
Now render again to see the wooden bowl. It should look like the picture at the top of the page.
Making a bowl: Step 5 - Reshape it
Because the bowl is a NURBS, we can now change its shape by editing the spline. Select the spline in the Object Manager, and use the Points tool to move a few of the points around and reshape the spline. Maybe a wider bowl with less of a lip :
Now render again, and you will have a new bowl:

Making a bowl: Step 6 - Use different wood
Maybe Walnut isn't the best, or we might want finer or swirlier grain. Whatever. If you double click on the Wood in the Material Manager, you will open up the settings dialog. Fiddle around with the settings to see what effects you can get. Perhaps you'd like something in Pine ?

Rendering with this material gives a new bowl:

You can get rid of some of the jagged edges by opening the Render Preferences dialog (from the File menu) and turning on Anti-Aliasing (Edge Color).


0 comments:
Post a Comment